Category Archives: Main Course

Addictions/Moroccan Chicken

Ok, so I am willing to admit that I have a little bit of a problem. Actually, I would rather call it an addiction, it seems more clinical and legitimate that way. I am addicted to buying spices. Now as an avid cook this isn’t inherently a bad thing, but considering I don’t know what to do with at least half of the spices that are currently decorating my fridge…well, yeah, you get it. You see, what happens is that I go to the store to get a spice or seasoning for a recipe I am making (the sane way to slowly build a collection). Then, while I am there I decide that I absolutely need a few others because I once saw a recipe that called for them and certainly I am going to want to buy them someday anyhow. Needless to say those recipes are nowhere to be found, but the spices still haunt me, calling my name, begging to be used.

My guilt about my addiction was the motivation behind this Moroccan chicken stew. I wanted a dish that made abundant use of my spice collection, but that also promised a deeply satisfying meal. I mean I may be a little nuts sometimes, but I am not going to throw together a whole bunch of spices and call it dinner, right? So after thinking, browsing and brainstorming, I finally decided that a Moroccan ‘tagine’ would be the perfect solution. This recipe was not made in a tagine and I can’t promise you that it is authentically Moroccan in any way. However, I can assure you that the savory mix of cinnamon, ginger, turmeric, coriander and cayenne pepper created a richness and depth of flavor that we just don’t find in North American food. Authentic or not, the flavors were authentically fantastic.

This dish is the ideal combination of sweet, savory and spicy. Chicken thighs are left to rest in dry spice mix overnight and then braised until they are so tender that they seem like an entirely separate being than the sawdusty chicken cutlets that so often plague our meals. Dried fruits and olives stud this stew, adding a sweetness and brininess that balances out the rich spices enrobing the chicken. Before serving, all the components are draped over a simple couscous that absorbs the flavorful juices, ensuring that not a smidge of flavor gets left out or left behind. Make sure to get a bit of everything in every bite, the balance of flavors is pretty close to perfect. Don’t thank me, thank my ‘addiction’ and the spices, of course.

Moroccan Chicken
(serves 4)

This recipe can be prepared ahead of time and can me multiplied very easily, so it’s perfect for dinner parties. I made this recipe twice, the first time I served it immediately and the second time I let it cool, kept in in the fridge for 2 days and then reheated it over low heat for 15 minutes, both were equally good.

I highly suggest serving this over couscous; a ‘classic’ base, the couscous absorbs all the juices and flavors. I usually count 1/4 cup per person, for some this wouldn’t be enough so adjust this according to your liking.

Aside from waiting overnight for the chicken in dry rub, this recipe takes only 45 minutes to prepare. Even the extra steps can be done along the way, chop the dried fruit while the chicken is simmering the first time around. Make the couscous in the last 15 minutes. Seriously, I am still trying to figure out how something so quick and easy can have so much depth of flavor.

Ingredients:
8 boneless, skinless chicken thighs (about 1 pound)
1 teaspoon cinnamon
1 teaspoon ginger
1/2 teaspoon turmeric
1 teaspoon coriander
1/2 teaspoon cayenne pepper (this is medium hot, cut this down or up, depending on your taste)
1 1/4 teaspoon kosher salt
1 onion, sliced in half rounds
2 1/2 cups chicken broth
1 1/2 cups chopped dried fruit (I used apricots and figs; dates, currants, raisins are other common choices)
1 1/2 cups pitted green olives
1 cup of couscous, prepared according to package instructions.

Directions:
1) Combine the spices in a large zip top bag. Add the chicken thighs. Shake the bag and make sure that all the thighs are evenly covered in the dry rub, place in the fridge overnight and up to 24 hours (you can also do this in a bowl, but I find zip tops are the easiest way to get everything evenly covered and stored).
2) When you’re ready to make the stew, heat a large pot over medium heat and add the onions. Cook until softened slightly, stirring a few times, about 3 minutes. Lay the chicken thighs in one layer over the onions, sprinkle any excess dry rub over the chicken. Pour in the broth and bring to a boil.
3) Once the broth is boiling, cover and turn the heat down to a simmer. After 15 minutes, flip over the pieces of chicken then add the dried fruit to the pot. Simmer, covered for another 15 minutes.
4) Take the lid off and add the olives, giving the stew a good stir. Simmer, uncovered for another 10 minutes. Serve immediately.

1 Comment

Filed under Chicken, Main Course

No Regrets/Asian Salmon + Farro Hash

I have a confession to make, I may have a very real crush on the man who sold me this piece of salmon on Saturday. It was the perfect first encounter, I flirted just enough to get the very best piece of fish and he oh-so-kindly acquiesced. As I walked away from the fish counter, he winked and reminded me to always maintain my sense of humor. Gently batting my eyelashes I stopped, looked at him and said, “I’ll be seeing you very soon.”

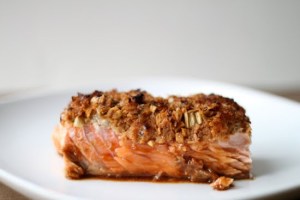
The truth is, I probably will be seeing him soon if only because I finally found a decent piece of fish in Montreal and now I want more. Montreal is notorious for it’s shortage of good fish; this combined with my ‘fish snobbism’ and aversion to supermarket fish means that I rarely get to eat it. Well, my new crush at the Jean-Talon Market (gosh, I wish I remembered his name) has definitely changed that. The piece he sold me was so fresh, flaky and tender that it would have fared just as well with a simple preparation as it did with the Asian marinade I used. Clearly he and I are meant to be; this is the stuff of fairy tales I tell you.

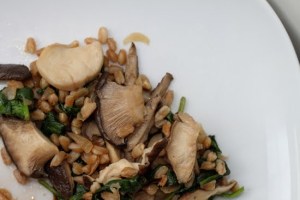
Although I am still busy recounting the details of my ‘moment’ with the fish guy, let me tell you a little about the recipe I used. I got this recipe from Ina Garten, who got it from Eli Zabar, the owner of several fantastic gourmet markets and stores in New York City. True to form, this recipe is no let-down; the panko crust, which absorbs the tangy, spicy, garlicky flavors of this simple marinade hugs the slightly undercooked, perfect piece of salmon. Add a side of farro, spinach and wild mushroom hash and dinner starts to get really racy. So here’s my suggested game plan, go shamelessly flirt with a fish vendor, come home with the best piece of salmon and make this recipe the same day, while the fish is at its freshest. You will definitely regret neither the flirting nor the dinner. I have a feeling if you choose to go all out and also make the hash, you won’t regret that either.

Eli’s Asian Salmon

adapted from Ina Garten
serves 4

Ingredients:

21 oz center-cut salmon fillet (1 1/2 inches thick)
1/2 c. soy sauce
1/4 cup rice vinegar
2 tbsp. freshly squeezed lemon juice
1 tbsp. toasted (dark) sesame oil
1 1/2 tsp. chili paste
1/2 c. sliced scallions (2 scallions)
1 clove minced garlic
2 tbsp. minced fresh ginger
3/4 c. panko (Japanese bread crumbs)

Directions:

1) Place the salmon in a 9 x 9″ glass baking dish.
2) In a mixing cup, combine the soy sauce, rice vinegar, lemon juice, sesame oil, chili paste, scallions, garlic, and ginger. Pour 1/3 of soy sauce mixture over the salmon fillet. Sprinkle the panko evenly over the fillet. Pour the rest of the soy sauce mixture evenly over the panko. Be sure to soak the panko completely and if any runs off, spoon back onto the salmon. Set aside for 15 minutes, leaving all the sauce in the pan.
3) Meanwhile, preheat the oven to 500 degrees F. Roast the salmon for 18 to 20 minutes, or for about 12 minutes per inch at the thickest part of the salmon. The internal temperature will be 120 degrees F on a meat thermometer when it’s done. Remove from the oven, wrap tightly with aluminum foil, and allow to rest for 15 minutes. Serve hot or at room temperature.

Mushroom, Spinach and Farro Hash

adapted from Food + Wine
serves 6

Ingredients:

3/4 cup farro
1 tbsp. olive oil
1 small onion thinly slice
2 c. sliced wild mushrooms
3 c. baby spinach
1 heaping tsp. kosher salt
Freshly ground pepper

Directions:

1) In a medium saucepan, cover the farro with 2 inches of water. Bring to a boil, cover and cook over low heat until the farro is tender, about 25 minutes. Drain the farro.
2) In a large skillet over medium heat and add the olive oil. When it shimmers add the onion and caramelize slowly, 10-15 minutes. Add the mushrooms, salt and pepper, and sautee for 5 minutes until soft. Turn off the heat.
3) Before serving, turn the heat back on and add the farro and spinach, stir together until warmed through and the spinach is wilted, about 5 minutes. Add more salt or pepper to taste.

Leave a comment

Filed under Asian, Fish, Main Course, Sides

Daring Cooks/Satay

This month’s Daring Cook’s Challenge was to make Thai satay. I have never made satay before but was pleasantly surprised to find out how simple it is. I think that the simplicity of this recipe makes it worthwhile to keep on hand because it can so easily be made on a whim and the marinade is an ideal balance between tangy and rich adding a deliciously intense flavor to the chicken (or whatever meat you use).

The January 2010 DC challenge was hosted by Cuppy of Cuppylicious and she chose a delicious Thai-inspired recipe for Pork Satay from the book 1000 Recipes by Martha Day.

Although satay can be made with practically anything, I chose to go down a simple route and use chicken and vegetables. The chicken was a great backdrop for the ginger, garlic and coriander that shone through the marinade. The vegetables were just the ideal side dish and I loved the way they absorbed the flavors of the marinade as they cooked. Although I have only ever eaten satay on a skewer, traditionally it is made either on or off the skewer. It is my personal belief that satay isn’t satay without a skewer, but a part of me wishes I hadn’t been so stubborn. It turns out that skewers will poke right through a zip loc bag, which I learned the hard ways as the marinade leaked through the holes in the marinating bag and all over my counter (I have the turmeric stains to prove it). Although I managed to salvage the chicken, it looks like the next time I make satay I will err on the side of caution and steer clear of sharp, pointy objects, that’s usually a good call anyhow.

Although I was pretty embarrassed by the mess I made, I was even more disappointed in the peanut dipping sauce recipe. In my opinion the coconut milk that the recipe called for overpowered the sauce and took away from the richness of the spices, soy sauce and peanut butter that were in there. It was almost as if the coconut milk subdued the crucial spices rather than amplify them the way a good satay sauce should and (usually) does. In the future I will probably make this sweet chile dipping sauce or Ina Garten’s satay dip. That being said, my disappointment in the sauce definitely didn’t take away from the dish overall; the marinade was so flavorful that the chicken and vegetables were delicious on their own. I will be definitely be making this again, which in my mind is proof enough that it is a worthwhile recipe for you to try as well. Just remember pointy skewers and zip loc bags are not a good match, I learned the hard way.

Chicken & Vegetable Satay
serves 4
Ingredients:
3 small onion, chopped
4 garlic cloves, crushed
3 T ginger root, chopped (optional) (4 cm cubed)
4 T lemon juice (1 oz or 30 mls)
2 T soy sauce (0.5 oz or 15 mls)
2 tsp ground coriander (5 mls)
2 tsp ground cumin (5 mls)
1 tsp ground turmeric (2-2.5 mls)
4 T vegetable oil (or peanut or olive oil) (30 mls)
3 chicken breasts
1 lb. mixed vegetables in 1″ pieces, I used zucchini, peppers, mushrooms and tomatoes.
Directions:
1) If you have a food processor or blender, dump in everything except the pork and blend until smooth. If not, chop onions, garlic and ginger really fine then mix it all together in a medium to large bowl. Divide into two equal portions.
2) Cut chicken into 1 inch strips. Cover chicken with marinade. You can place the pork into a bowl, cover/seal and chill, or place the whole lot of it into a ziploc bag, seal and chill. Make sure to marinate it for at least 6 hours and up to 24 hours.
3) Divide the vegetables on skewers and place in a 9 x 13″ glass baking dish, pour the marinade over it. These only need to marinate for a few hours, turn them occasionally.

Cooking Instructions:
1) Set a large sautee pan over medium-high heat. Cook the chicken for 3-4 minutes a side (depending on the size of the piece of chicken) until cooked through. Make sure the pan is hot enough to make a slightly charred crust on the chicken.
2) Oven roast the vegetables in the marinating dish (with the marinade) for 20 minutes at 400 degrees, this allows them to caramelize with the marinade and cook all the way through. Do this while you’re cooking the chicken.

Leave a comment

Filed under Chicken, Main Course, Thai

Comfort Foods/Brisket

I can’t get over how orange this blog is right now, browsing through these posts I realized that it seems like I have only been eating root vegetables and squash. Factor in the orange background and I am getting worried that I am victim to some bizarre color hypnosis. Maybe it’s too orange, but I can’t help it, orange foods just taste so good. Also, orange is such a happy color that each time my blog pops up all it just adds a flash of brightness to my day. When I was contemplating all this orange business I realized that recently Stefi told me I looked tan even though I have been a prisoner of the halogen lighting in the library. Suddenly it hit me, is it actually possible that the myth of beta-carotene giving skin an orange glow is actually true? If so, you can expect to be seeing a LOT more orange food around here.

Although I made this brisket with parsnips, carrots and sweet potatoes before the ‘orange revelation’, if it turns out that orange food is keeping me looking sunny I think I will be making this again sooner than I expected. I was really excited about this brisket because it was my first time making any slow-cooked or braised meat. I definitely liked it after tasting it, but I deemed it a success when Stefi said it reminded her of Friday night dinners at home. That was the best compliment I could have asked for, successfully duplicating someone’s favorite comfort foods is an honor.

I really lacked all the kitchen equipment the recipe called for, but I refused to be deterred and the mishaps along the way just made the whole thing taste better in the end. I used the overflowing braising liquid to cook the farro, which imparted an incredibly meaty and rich depth of flavor to it. A lot of people don’t know about farro, a classic Italian grain, but it’s one of my absolute favorites. It’s nutty and dense and is a great earthy backdrop for something like brisket, but it’s also just as good for cold summer salads. Although the sides were quite delicious (and glow inducing) they were only there to complement the star, the brisket. After hanging out in the oven for a few hours with wine, onions and broth, this brisket was tender and full of flavor. Like most briskets it tasted even better the next day and maybe even better the day after that. The only downside is that it takes quite a few hours to make, but 90% is hands-off time and you will have leftovers for days. Also, as it gets chillier out it’s a perfect excuse to stay cozy inside “Sorry Sally, I can’t come meet you I have a brisket in the oven” (try it, it has worked for me in the past). Basically, this simple piece of meat (and the sides) will make you look tan, feed you for days, and keep you warm. Well, no promises, but I can assure that it tastes good, which is really the only part that matters.

Brisket with Farro and Root Vegetables
(adapted from Martha Stewart)

Ingredients:
1 first cut of beef brisket (5 pounds)
Coarse salt and freshly ground pepper
3 tbsp. extra-virgin olive oil, plus more if needed
3 large onions, halved and thinly sliced + 1 chopped onion (keep separate)
2 garlic cloves, minced
2 tbsp. tomato paste
2 cups dry red wine
4 1/2 c. homemade or store-bought low-sodium chicken stock
2 fresh or dried bay leaves, plus more fresh for garnish if desired
1 pound parsnips, peeled and cut in 1/4″ rounds
4 carrots, peeled and sliced in 1/4″ rounds
3 sweet potatoes, peeled and sliced in 1/4″ half moons
1 tbsp. balsamic vinegar
1 c. farro
1 c. water

For the Brisket:
1. Preheat oven to 325 degrees. Season both sides of brisket with salt and pepper. Place a roasting pan across 2 burners on medium-high. Heat 3 tablespoons oil in pan. Add brisket; sear until browned, 4 to 5 minutes per side. Transfer to a plate.
2. Reduce heat to medium. Add onion and minced garlic to pan; cook, stirring often, until onion is soft, about 4 minutes. (Add more oil to pan if needed.) Stir in tomato paste, and cook for 1 minute more. Stir in wine, and cook, scraping any browned bits from bottom of pan.
3. Add stock and bay leaves, and bring to a boil. Add the brisket to the pan, and cover with foil. Transfer to oven, and roast until meat is very tender, about 2 hours. Flip meat over. Cover, and roast for 30 minutes more.
4. Add vegetables to brisket, cover, and roast until meat and vegetables are tender, about 1 hour. Transfer vegetables to a platter and meat to a cutting board, reserving pan sauce. Tent meat with foil; let rest.
5. Heat the pan sauce in a saucepan until slightly reduced.
6. Thinly slice brisket against the grain. Arrange slices on a platter with the vegetables. Season with pepper, and drizzle with some sauce. Serve immediately with remaining sauce.

For the Farro:
1) While the brisket is in it’s last hour of cooking, prepare the farro.
2) Heat up a glug of olive oil a medium sized pot and add the onion, cook until soft. Add in the farro, 2 ladles of cooking liquid from the brisket, and a cup of water.
3) Bring to a boil and then turn down the heat to medium low. Cook covered for 10 minutes, uncover and cook for another 10-15 minutes until the farro is tender and all the liquid has been absorbed. Use this as a bed for the brisket and vegetables.

Notes:
I dont have a roasting pan, so I seared the meat in my largest pot and then cooked it in a 9×13″ glass dish (hence the overflow). This worked just as well.
• Play around with the vegetables based on your preferences, anything goes.

Leave a comment

Filed under Beef, Comfort Food, Jewish Food, Main Course

Greek Life/Moussaka

I remember when I was applying to college, ‘the list’ was defined by finding schools that satisfied a few basic criteria. Big or small? Metropolitan or rural? And so on, until finally the most important question was asked, “Greek life?” From my perspective, eight years at a small all-girls school was the only taste of sorority life I ever needed. Other people saw the opportunity to pledge as a right of passage and a crucial part of a ‘real’ college experience. To be honest, I could care less about some pin that I will keep for the rest of my life until my daughter becomes a ‘legacy’ member of the same sorority as me. But hey, I am just being opinionated here, I know lovely and amazing women who are in sororities, so I shouldn’t generalize.

If it’s any comfort to all you sorority sisters and fraternity brothers out there, my love for Greek food most certainly makes up for my dislike of Greek life. Unfortunately, my only benchmarks for Greek food are in North America, which I assume is a somewhat bastardized version that would probably make any Greek person cry (similarly to how I feel about Italian food, but we’ll save that topic for another day). So I apologetically say that based only on the Greek (or “greek”) food I have had, I just love it. However, until this week, I had never made any Greek food myself, unless you count frozen spanakopita from Costco, which I fear is especially cringe-worthy. The plethora of Greek restaurants in Montreal and New York means that I can always go out for great Greek food and to be honest, I have never wanted to be the person bastardizing these delicious dishes. So, I had no intention of ‘going Greek’ this week, but when I asked my roommate to pick a recipe for me to make, she chose Moussaka. The jury had spoken and I could no longer shy away from making my own Greek food.

Well all I can say is, thanks roomie. It looks like her help is going to become an essential part of this blog, that girl sure knows how to pick a recipe. I can’t promise that this Moussaka is authentic, but I can assure you that it is very good. The fragrant meat is amped-up by a creamy cheese sauce and rounds of slightly chewy broiled eggplant. With just a touch of cinnamon and nutmeg, this dish develops a warmth and heartiness that would be hard to find in any other setting. It is definitely very rich, not an everyday dinner, but for guests or even after a long day, this is an ideal choice. All I can say is, if “Greek life” is as good as this Moussaka, I may just have to reconsider.

Moussaka
adapted from Canadian Livings “Everyday Favourites”

Ingredients:
1 large eggplant
1/2 tbsp. salt
1 tbsp. extra-virgin olive oil

Meat Sauce:
1 lb. lean ground beef or lamb
1 onion, chopped
2 cloves garlic, minced
1 tbsp. dried oregano
1/2 tsp. cinnamon
1/2 cup red wine
1 14 oz can chopped tomatoes
2 (heaping) tbsp. tomato paste

Cheese Sauce:
3 tbsp. butter
3 tbsp. flour
1 1/2 cups milk
1/4 tsp. salt
1/4 tsp. ground black pepper
pinch of nutmeg
1/2 cup crumbled feta cheese
1/4 cream cheese

Directions:
–> Cut eggplants into 1/4″ thick slices, layer in a colander, sprinkling each layer with salt. Let stand for thirty mins.

Meat Sauce:
• fry meat over high heat breaking up with a spoon, until cooked through. Drain off the fat. Add onions, garlic, oregano, cinnamon and pepper; sautée over medium-high heat until the onions are softened. (abt. 5 mins.)
• Add wine, tomatoes, and tomato paste; bring to a boil. Reduce heat to medium; cook until the mixture does not fill when a spoon is drawn through the pan, about 10 minutes. Set aside.

–>Rinse the eggplant; drain well and pat dry. In batches, brush it with oil and broil on baking sheet, turning once, until golden and translucent, 8 t0 12 minutes. Set aside.

Cheese Sauce:
• in a saucepan, melt butter over medium heat; whisk in flour and cook, whisking, for 2 minutes, without browning. Gradually whisk in the milk and cook until just boiling and thickened enough to coat the back of a spoon. about 5 minutes. Season with salt, pepper, and nutmeg. Let stand to cool down a bit for 10 minutes.
• rinse feta and drain well, mix the drained feta and the cream cheese into the sauce.

Prepare:
• Spread half of the meat sauce in a 9-x9-inch glass baking dish. Spoon a little less than half of the cheese sauce on top, spreading evenly. Layer with half of the eggplant, overlapping if need be. Repeat layers once.
• Bake at 350 degrees for 45 minutes, until bubbling.

Notes:
• You can make this ahead by skipping the baking part, covering with plastic wrap and refrigerating for up to 24 hours OR overwrap the dish with foil and freeze for up to 3 weeks. Thaw in the fridge for 48 hours before baking.

Leave a comment

Filed under Casserole, Greek, Main Course, Meat